Free templates & patterns
130+ freebies are waiting in the Haunted Library
Templates, patterns and printables for every project on the blog.
Formerly Making Make Believe · Join the Haunted Library

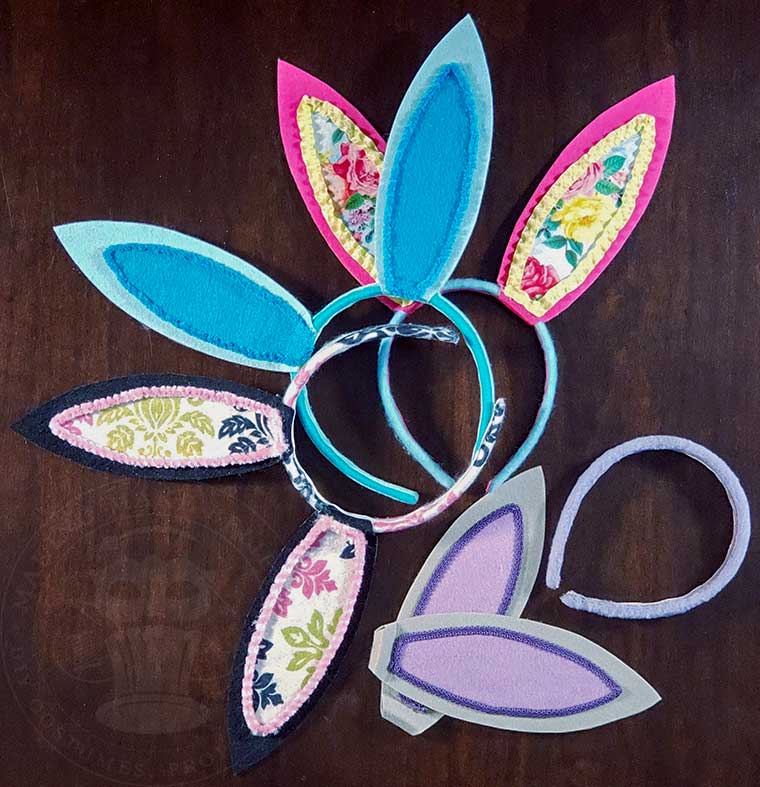
It’s Spring, Easter is on the horizon, and costume bunny ears are in season. Not to be left out, I decided to take a stab at making reasonably tall bunny ears without faux fur or wire.
After playing around with a few different materials, I opted for stiffened felt to keep these ears upright. While the outer ear does the heavy lifting, I wanted something fun and pretty for the inner ear, so I went with craft felt, which I then trimmed out with some ribbon.
Slip the ears over a coordinating headband crafted using the No Stitch Headband Cover, and we’re all set to hippity-hop.
These are fun for kiddos and adults alike, but don’t limit these to just Easter. These make fun party favors, photo booth props, and baby shower decor. Get a group together and go to your next pub crawl as a band of bunnies. Add an earring or other bling to your ears to further customize your look.
You get the idea. So, let’s hop to it.
Materials:
NOTE: This pattern fits a ¾” smooth, plastic headband.

Tools:
To machine cut:
To hand cut:
NOTE: If using a cutting machine, be sure to secure your material to the proper mat for your machine. The size of this cut may require a larger than standard cutting mat. Select the proper cutting settings and install the correct cutting blade for the material.
Before You Get Started:
Download the free Quick Bunny Ears Pattern PDF or SVG Cut File from the Haunted Library.
If you are going to use a cutting machine, upload the pattern file to your design software. To cut by hand, print and cut out the pattern and trace or pin onto the wrong side of your material.
Steps:

1. Cut out the outer ear piece from the stiffened felt. Cut the inner ear piece from the scrap felt.

2. Place outer ear piece wrong side up. Beginning at the center (the most narrow point in the middle), measure out 3/4″ and draw a line from edge to edge. Do this for both outer ear pieces.
TIP: To ensure that the ears will slide over your headband, fold at center, clip just above your mark and slip onto the headband. Adjust your mark as needed to fit your particular headband.

3. Apply E6000 craft adhesive to the wrong side of the outer ear pieces ABOVE the lines you marked. Fold one side onto the other, matching the ear tip and edges. If needed, clip to hold while the glue dries.
TIP: I tested several adhesives, and I like E6000 the best for stiffened felt.

4. Slip outer ear onto headband and position as desired. Secure to the headband with hot glue or leave loose so you can slip them on and off the headband.

5. Take the inner ear piece and glue to outer ear piece where desired.

6. Embellish ears with ribbon, trim or other decoration.

And, quick as a bunny, your ears are ready to wear.
Let me know if you make a set as I’d love to see it. Tag me on Facebook or Instagram.


Templates, patterns and printables for every project on the blog.

Counting down to Halloween since the 1970s. I create, style and celebrate all things costume and Halloween, all year round.
Welcome to my world of Halloween Ever After, where I create, style, and celebrate all things costume and Halloween.
Within these haunted pages lie affiliate links to curious and captivating finds I love. If you make a purchase through them, I may earn a modest commission (think fun-size candy bar), which helps keep the Halloween magic alive. No extra cost to you – cross my batty heart.



Check your email for the Haunted Library password.
Don’t miss a moment of the mischief.
Add hello@halloweeneverafter.com to your address book.
The magic happens right here in my studio and office. When you step inside my creative space, you’ll find an ever expanding gallery wall overflowing with original spooky art and classic Halloween LPs, right alongside a haunted cabinet packed to the brim with vintage curiosities.
It’s under the watchful eyes of these retro treasures that I design and craft.
Join us and get access to our Haunted Library stocked with templates, printables, cut files, and exclusive content. Plus, you’ll receive Eerie Emails just for our subscribers.
*Stay as long as you like. Unsubscribe at any time.


